Grunt fireworks
Posted May 27th 2011
- Introduction
- Setting up with no bridge descent
- Setting up with bridge descent
- Further remarks on setting up
- Taking Shades the other way
- Pre-frozen Grunt in the tunnel
- History
Introduction
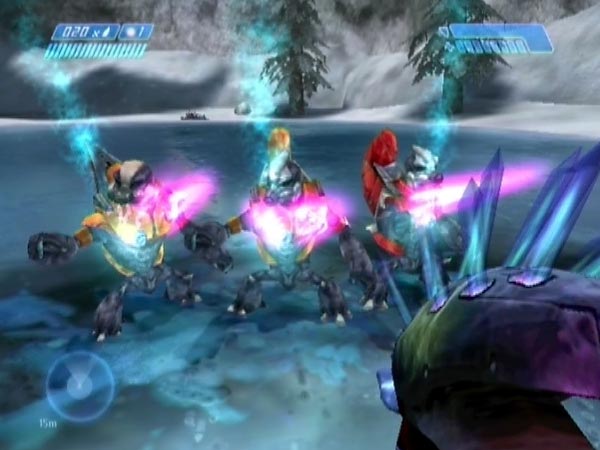
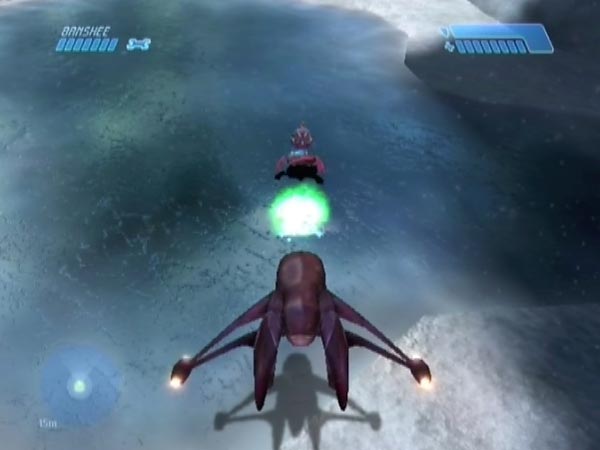
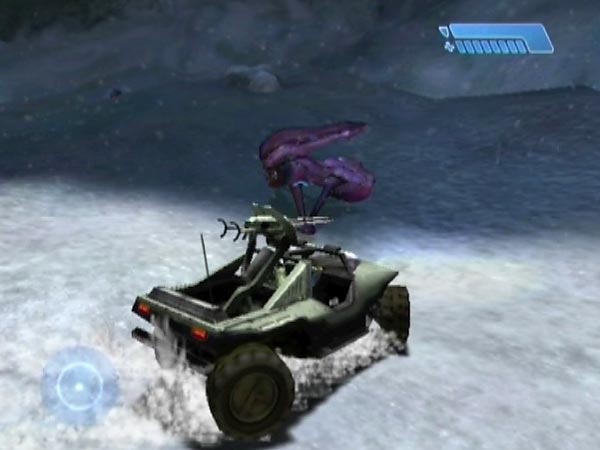
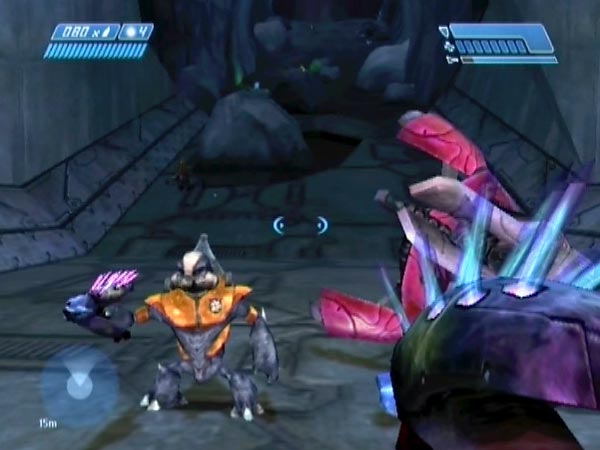
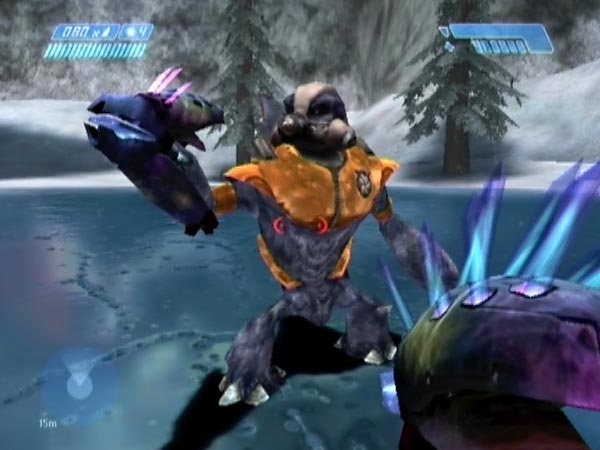
Back when I was expanding my Elite fireworks mischief I had an idea for getting a frozen Grunt to launch in similar fashion, but it didn't work out in the manner expected and I ended up disappointed. Later on though, a breakthrough transformed the picture. The key is to push a manned Shade across the loading point, something easily done with a Banshee. Your presence maintains his active state (stops him entering a strange 'passive' state), which enables you to get him frozen. When you subsequently eject the gunner then go back across the loading point and return, you'll find that he's frozen, ready for launch. You can have more than one such Grunt if you want, getting them frozen one at a time. The two pics here show a tight group of three from the cavern.
Obtaining a frozen Grunt can not only be done pushing an early Shade forwards over the loading point, but also pushing a later Shade backwards over the loading point, thus giving you a firework in the cavern or in the earlier snowy areas. Basically then, there's a whole lot of potential. And unlike in the case for my Elite fireworks, you don't even need to be able to descend off the bridge - something which should please folk who have trouble with that. You can read more about how things developed in my history section at the end.
The fun you can have with frozen Grunts is very similar to what you can enjoy with frozen Elites - including amusing screams on launch - so I won't describe all that again. The main difference is simply that a Grunt will go further for the same amount of blast, being considerably lighter than an Elite. But you might want to crouch when needling, for better targeting. Now let's get going with the main business, elaborating on how to set things up in various ways.
Setting up with no bridge descent
In this section I'll describe how to set things up without even using a descent trick off the first bridge. Throughout, preferably kill all triggered enemies and make sure all Marines die, to help maximize the game's handling capacity in your launch area later.
Get the platform Banshee and clear the way
After triggering the first ground battle, you might want to get the sniper rifle and rocket launcher. You'll want a sniper rifle and at least one launcher for your later firework fun but there are some future places you can get these weapons, so this early pair isn't actually critical.
Fight your way onwards and steal the platform Banshee after the crashed Pelican area. You could either start using it or just leave it on the ground to return for later when it's time to start pushing a manned Shade.
When you head into the tunnel leading to the cavern, have a sniper rifle and rocket launcher with you, but eliminate any remaining Marine company to avoid unwanted interference. Kill all cavern troops except the Shade gunner you want for your firework. The handiest Shade to use would be the one nearest the cavern exit.
Head on through the level to make things safe for when you eventually push the Shade along. At the same time you can do some weapon collection. In particular you'll want a good few needlers, just like with Elite fireworks. If you're in the Banshee you could potentially get a replacement from the tower, or just blast the tower Banshee down for possible later use.
Push the manned Shade to the launch area
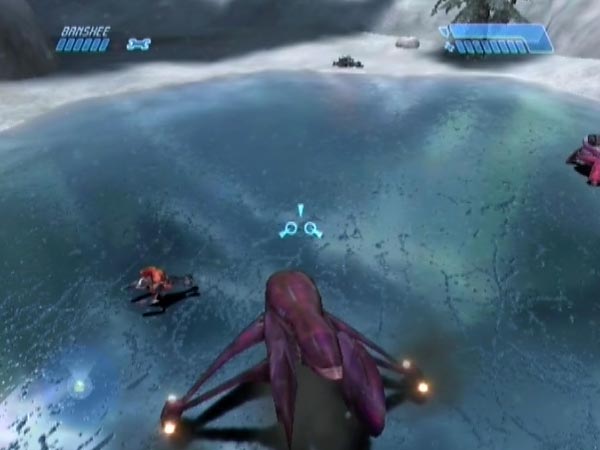
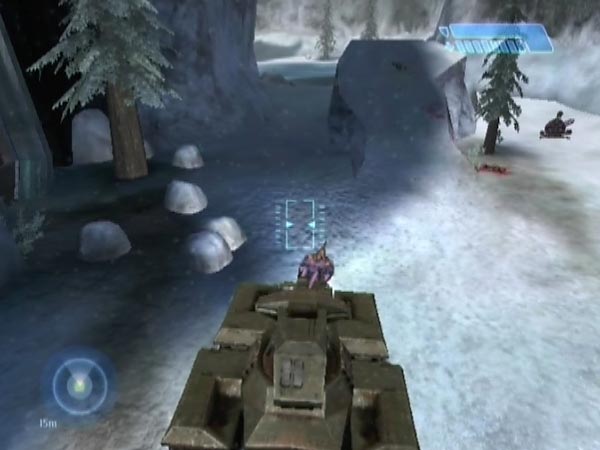
In your Banshee, trigger a tunnel checkpoint but keep it delayed by firing as you fly to your selected manned Shade. Once you're close and noticed, the delay will continue by enemy threat. Push the Shade to the chosen launch area with the nose of the Banshee. It's slightly delicate and may take a bit of getting used to, but the Grunt won't fire as long as you remain close. When you're practiced at this you shouldn't take any fire the whole way, nor as you arrive or fly off, and you can get through the tunnel within five minutes.
A few tips. Push from the front as the Shade will be at its most stable that way. It could easily topple over if you push it sideways. If the Grunt falls out when you're past the loading point, he doesn't seem to reboard. Before that he might reboard, but it seems fickle. Try to keep the Shade away from walls and rocks, as it can be awkward to get it away from those. Be especially careful where the tunnel paving ends, a tricky bit to negotiate cleanly. To arrive at the Shade without taking fire, spiral or fall into place, exploiting the slowness of the Grunt's aim adjusting. To later get clear without taking fire, angle up and fly off over the top, exploiting his slowness in swivelling.
Eject the Grunt and finish off
Now the Shade is at the launch area, get distant enough to finally get the checkpoint you were delaying, then close in again and eject the Grunt with a Banshee blast. Make sure he's pointing the gun your way before you fire, as it gives him some protection. If you fire too close and kill him, you can just revert for another quick go, thanks to the checkpoint. That was the reason for wanting the checkpoint.
If the ejected Grunt is not quite where you want him, you can move him fairly easily by making small forward motions with your Banshee just to either side of him, to make him dive repeatedly. He'll shoot at you if he gets the chance, but there are three Banshees available in all so you can probably afford to take some damage. Alternatively you could use a Ghost, though you may find it slightly harder to make him dive. If you want the Banshee from the twin bridges area and you haven't yet gone beyond the area with the huge tower, fly high when heading through the pass to the spiral path area, to avoid triggering enemies.
When you're done, depart in your Banshee. He'll face you as you go, and that's pretty much how he'll end up freezing; so you have control over which way his body will be facing. Go back across the loading point to freeze him. You can now return to do any final preparations you wish, such as weapon positioning or moving plasma grenades. When everything's ready, get a checkpoint to finish off, just like with Elite fireworks.
Avoiding the anti-aim effect
As with Elites, a frozen Grunt may exhibit an unpleasant anti-aim effect when damaged but not dead. It's nicer if a Grunt dies from a single rocket blast or needle bang. If you like, you can arrange that by weakening him in advance, as for an Elite.
Other Shades and multiple fireworks
If you want additional or alternative frozen Grunts, that's no problem. Having left the relevant Grunts alive, just bring them along and get them frozen, one at a time. As well as Shades from the cavern, there are earlier ones you could push along. I've tried them all and things seem to work pretty much the same. I even used one from the 'balcony' in the two-Wraith area, after pushing it off the edge down to the sloping path into the tunnel (fortunately the gunner remained seated during the fall).
For Grunts earlier than the cavern though, there are a couple of differences with reboarding behaviour if they fall out. They seem to have no reboarding ability at all, except for the one nearest the door when you emerge into the first ground battle (known as 'Herbie' in tricking circles), who'll reboard anywhere. That Grunt is the only gunner who carries a needler, incidentally.
There may be a possibility for reusing a cavern Shade for transportation, to add to the number of frozen Grunts. Each of those Shades has two or three Grunts associated with it. If you take the Shade back to where the tunnel paving is level and then fly on over the loading point, an associated Grunt will run to it (and he won't fire when running, which is handy). Stay near him as he crosses the loading point, and follow him to the Shade. Once he's aboard, you can start pushing. However, my experience so far (with the Shade nearest the cavern exit) has been that the associated Grunt you froze earlier will disappear in the meanwhile (see the 'disappearance glitch' below), as if you're not allowed to have more than one Grunt from each group. So I'm not sure whether Shade reuse can boost the Grunt count.
In regard to the two Shades in the first ground battle, it's easy to get the one on the plateau down with the gunner still aboard. Just push it off the sloping side facing the ice patch, and it sticks to the slope remarkably well. To get either of the Shades over the subsequent 'step' to the crashed Pelican area, first put a Ghost on the low side at the left corner as you look at the step from the ice. Push the Shade off the step there, and the Ghost tends to keep it upright until it's settled.
Here's a general tip for good working when trying to assemble multiple frozen Grunts. Preferably get a consolidating checkpoint at your frozen group each time you've added to the count, as a precaution against anything going wrong during the next attempted addition.
Disappearance glitch
The one downside to things is that when you've ejected a Grunt and you head off back across the loading point to get him frozen, you may find him gone when you return, or possibly some earlier frozen Grunt may be gone. I don't know if this is somehow preventable, but if you get a disappearance it's certainly worth reverting to try again, assuming you haven't got a checkpoint in the meanwhile. I think there's a degree of fickleness to Grunt disappearance, so you may be lucky on another attempt.
Setting up with bridge descent
If you care to descend from the first bridge, you can do various things as part of an alternative set-up plan. This would be especially useful in creating a base save with as much work done as possible. Here's what I've got in mind.
You can fetch the twin bridges Banshee to use (so, you won't need to rocket the platform Banshee down later). With this you can blast the tower Banshee and platform Banshee down to the ground, thus preventing enemy use. They can be moved to anywhere you like for possible future use as healthy replacements.
You can destroy the Wraith and overturn any Shades or Ghosts which could be a threat later.
You can move a load of needlers from the first bridge to the launch area, as described in my Needler provision section for Elite fireworks.
If you want a cavern Grunt or 'Herbie' to be a firework later (these are the ones whose Shades are already present), you can move the relevant Shade part of the way beforehand to save some pushing later, but don't take it past the loading point. If you're going to want multiple fireworks, you can move multiple Shades in advance, but don't put them too close together. Have them separated well enough to be able to start pushing each manned Shade along without taking lots of fire from others. You could have one just before the loading point, one back around the corner, and one back around the next corner. Later when you're playing through and you arrive at the cavern, cavern Grunts will run to man any Shades you moved.
Subsequent work
Having done all you want, it's time to resume normal play and complete the set-up work. With the aid of your Banshee you can speed things along quite a lot if you wish. For starters you have the option of skipping the indoor section after the first bridge, as with Elite Fireworks. You can skip the crashed Pelican area by flying high enough to avoid the trigger zone, in which case you'll also get no enemies in the two-Wraith area. If you do trigger the crashed Pelican area though, you can still skip the two-Wraith area by flying high enough to avoid the trigger zone, again as with Elite Fireworks. From the cavern onwards, the work will be pretty similar to what was described for the earlier plan.
Further remarks on setting up
Here's an assortment of extra comments concerning setting up.
Other ways of pushing manned Shades
Alternatives to using the Banshee for pushing a manned Shade are the Warthog or Scorpion. They have the advantage of being indestructible, but on the minus side they're clumsier and you're more likely to take fire, partly because your body tends to be more distant from the Shade (hence the Grunt more readily gets a chance to open fire). If your shield ever gets low, just make sure to stay close to the Shade for a while to let it recharge. I much prefer the fine control afforded by a Banshee, but if you're finding it hard to get the knack of pushing with a Banshee, these other vehicles are worth trying.
With Scorpion use in mind, you could've left it in a handy place after descending from the first bridge. It can do quite a nice job of pushing. The Shade gets sort of caught up at the front and you can drive along at full speed or thereabouts, though you have to be careful that the Shade doesn't start going 'through' the tank.
If you're going to use the hog or tank for pushing, here's what you could do in regard to eventual Grunt ejection. Before starting the push, place a Banshee near the launch area. Go back and move your selected vehicle right up to the Shade, ready to start the long push. Dismount and trigger a tunnel checkpoint on foot, keeping it delayed by jumping. Reboard your vehicle and push the Shade to the launch area. The checkpoint gets delayed by enemy threat during that phase. Dismount and board the Banshee, making sure to keep the checkpoint delayed. Ascend high enough to get the checkpoint. You can now make attempts at ejecting the Grunt as usual.
Grunt ejection without a checkpoint
In my original plan I said to keep a checkpoint delayed while pushing a manned Shade, so you can subsequently get the checkpoint as a precursor to ejection attempts. If you'd rather not bother with a checkpoint however, that could still be ok. For the ejection you could edge Banshee blasts closer and closer to the Shade from a decent distance (so Shade fire won't be much of a concern), and eventually one will hopefully get just close enough to do the ejection without killing the occupant. Alternatively - and probably safer - you could push the Shade over with the Banshee. Push at the side (not on ice) and it'll gradually go over, but be careful the Grunt doesn't get squashed at the end.
Extra needlers when not using a bridge descent
Even if you set things up without using a bridge descent, at some point you could still move needlers from earlier in the level, to add to your weapon collection at the launch site.
Taking Shades the other way
Thus far I've been talking about pushing manned Shades forward through the level. But it's also possible to push later manned Shades backwards through the level and over the loading point, to end up with fireworks in an earlier area, extending the playground so to speak. Things work just the same. In particular you could have fireworks in the cavern, the two-Wraith area, or the crashed Pelican area. You can use the Shade on the small slope outside the tower entrance, and also the one around the other side after shunting it off the plateau (get a checkpoint before the shunt, as it may take a few goes to succeed in keeping the gunner seated). I expect you can even use later Shades if you want more fireworks, but I haven't checked that yet. I'll expand this section at a later date to give fuller information on everything, including release lines, and will probably also do a movie showing some of the resulting fireworks.
Pre-frozen Grunt in the tunnel
It's possible to get a Grunt who's already frozen when you meet him, somewhat akin to my pre-frozen Elites, but I was only able to obtain this situation in a certain area of tunnel. Here's how.
After doing a descent trick off the first bridge, move the Shade below to the final flat (level) paved section of tunnel after the cavern, and make sure it's overturned. It mustn't be further than the end of that flat section, otherwise the Grunt won't appear - or so I found. Return and resume normal play. When you get back to the Shade you should find the Grunt frozen there. Typically he'll be on the ground but occasionally I've seen him balanced on the Shade. If you need to remove it from under him, see my advice about removing Ghosts from under pre-frozen Elites.
Eliminate any threatening enemies, do any final preparation, and save a checkpoint to finish off. You could get a delayed tunnel checkpoint, or you could use the checkpoint associated with triggering the dropship. I'd suggest the former, because in that case it's fine to leave the Jackals alive (they won't come down after you as long as you haven't triggered the dropship yet).
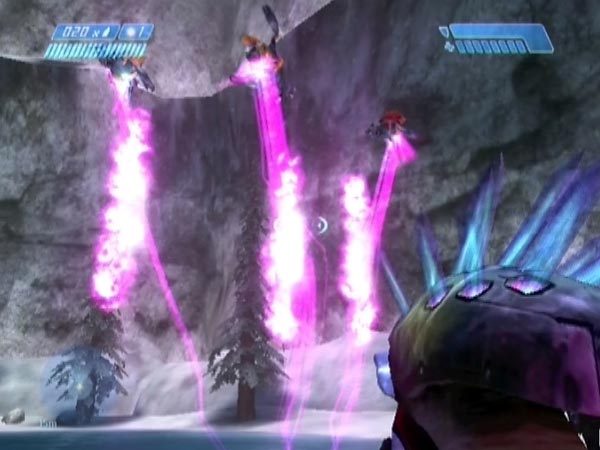
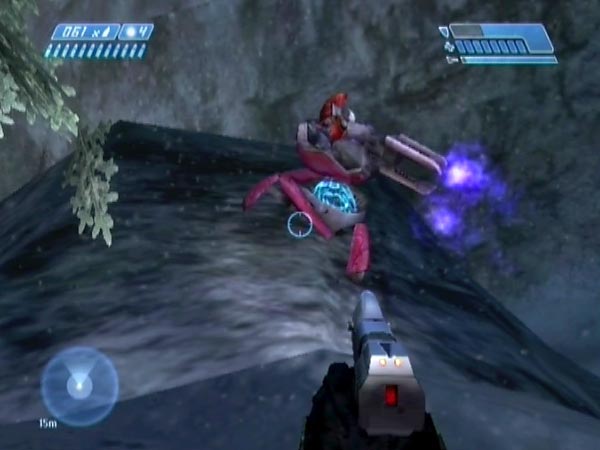
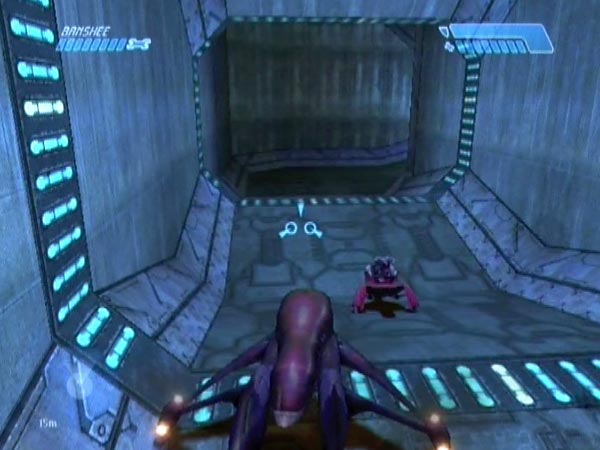
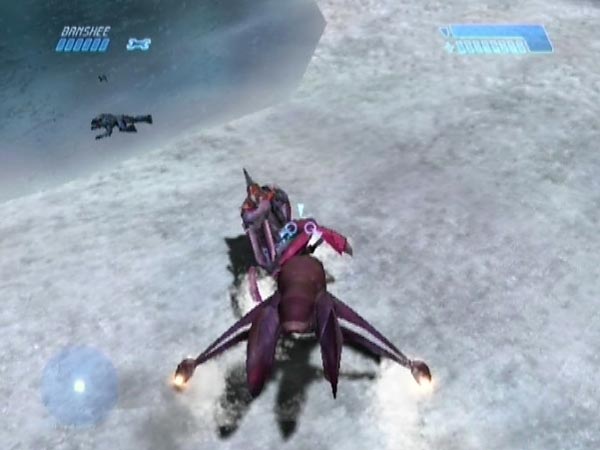
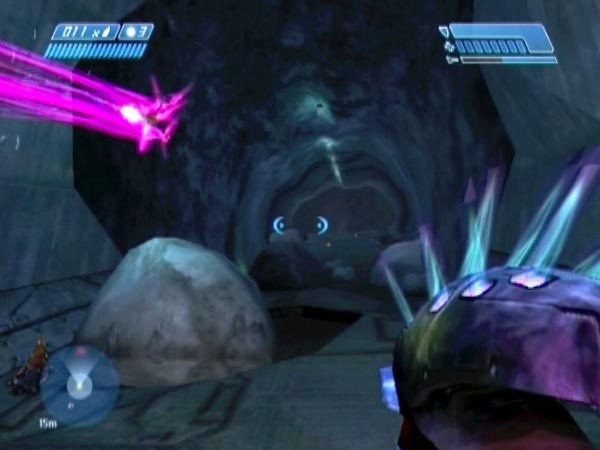
You're now ready to launch the Grunt. There's a handy release line a couple of metres before the start of the slope (see picture 3 here). Probably the best fun is to get the Grunt flying up the tunnel, possibly ricocheting around as he goes. That can be quite spectacular, and if there are any Jackals up there, they might get a nasty shock!
History
Back when I was expanding my Elite fireworks mischief in late 2010, I had an idea. Maybe I could similarly get a frozen Grunt to launch? The obvious candidate was the one who normally spawns in the Shade outside the door as you trigger the first ground battle. If you've moved that Shade beforehand (having done a descent off the bridge), he'll still materialize in it, analogous to how those Ghost pilots still end up in their Ghosts if moved beforehand. I figured that if I moved the Shade to where I'd had my Elite fireworks, the Grunt might freeze when ejected, the same way those Ghost pilots do. But it didn't work. Instead of freezing he continued to be strangely passive (not attacking) just like when he was still aboard. The passivity is presumably linked to him being out of his intended loading zone. When I went back across the loading point, he vanished.
Ok then, how about having the Shade overturned in advance? In the case of an overturned Ghost, you find the pilot pre-frozen beside or on top of it when you return later. So maybe the same would happen with the Grunt? But there I met only with limited success. It only seems to work if the Shade is positioned no further than the end of the final flat section of tunnel after the cavern. Beyond that, the Grunt didn't turn up at all! So it looked like I'd only be able to get a Grunt firework in a fairly small area of the tunnel, giving no opportunity for sending one up into the sky. Big disappointment.
Breakthrough via Shade pushing
But a few months later while working on my Right behind you article, in which the early Shade had been moved to just before the loading point, I made a breakthrough. I found that if I pushed the now manned Shade onwards through the level with my Banshee, the Grunt stayed active (he didn't become passive), and remained active when subsequently ejected out in the open. This was already something new, to have him active when so far through the level. More importantly though, when I flew back across the loading point and returned to the ejected Grunt, he was frozen! So I finally had a way of getting a frozen Grunt out in the open for some high-flying firework fun. Wahoo!
More firework candidates
After a while I was struck with a sudden thought. How about pushing some other manned Shade through the level, such as the Shades in the cavern not far from the loading point? I tried it and it worked just the same! So there was actually no need for using that early Shade after all, and this also meant that you'd be able to get frozen Grunts without needing to descend off the bridge - which some folk might welcome. It also meant that you could have multiple fireworks together.
Fireworks earlier in the level too
A bit later on I had the idea of pushing a later manned Shade back across the loading point, and found that I could freeze the gunner in the same way as the others. I used the Shade from the ramp-like hill outside the tower and ended up having some firework fun in the cavern. So the scope for grunty fireworks was nicely expanded.