Massed Hunters
Posted March 2nd 2007, expanded May 5th 2011
Associated movies
- BCM34 - Normal; Close combat with assorted weaponry (4:53)
- BCM35 - Normal; Two beach sweeps with a nine-man squad (4:03)
- BCM42 - Heroic; Everybody jump (4:58)
- BCM51 - Heroic; Hog fun with Stacker (5:04)
- BCM148 - Heroic; Close combat revisited on higher difficulty (6:04)
- BCM188 - Normal; Four beach sweeps with Marines (6:30)
- The basic idea
- Creating a good save
- Adding and adjusting Hunters
- Details on the Hunter pairs
- Locations and using a base save
- Marine assault
The basic idea
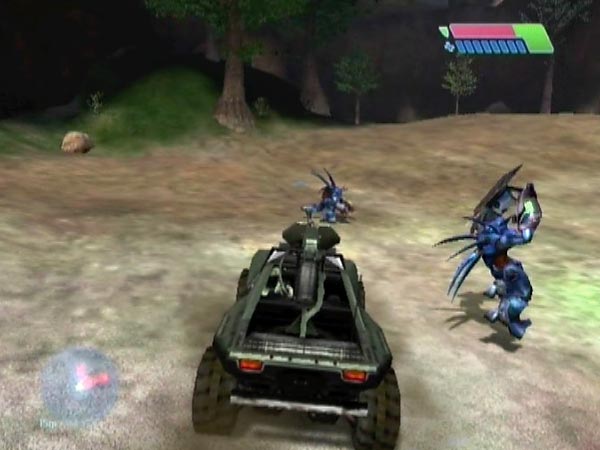
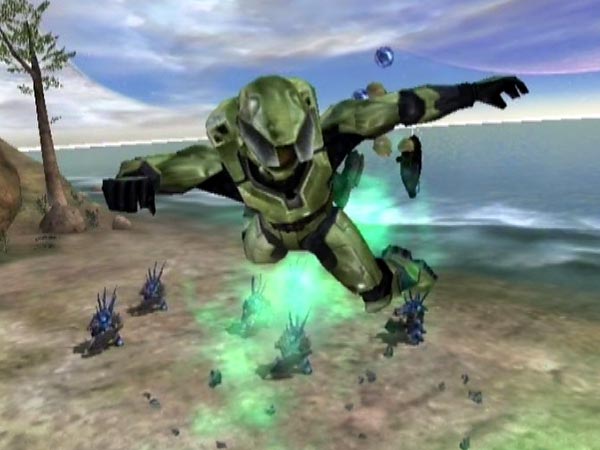
There are plenty of Hunters on the island, and by leading them into position you can amass as many as six to have fun with. They can make a spectacular sight, so be sure to take a bit of time to just admire them once in a while before slaughtering the lot. Here's the sort of fun you can enjoy.
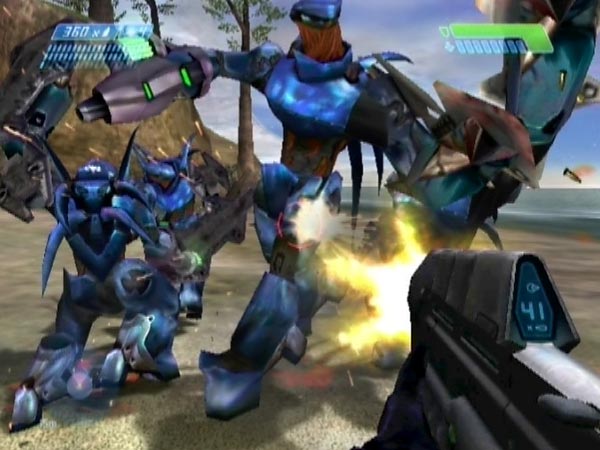
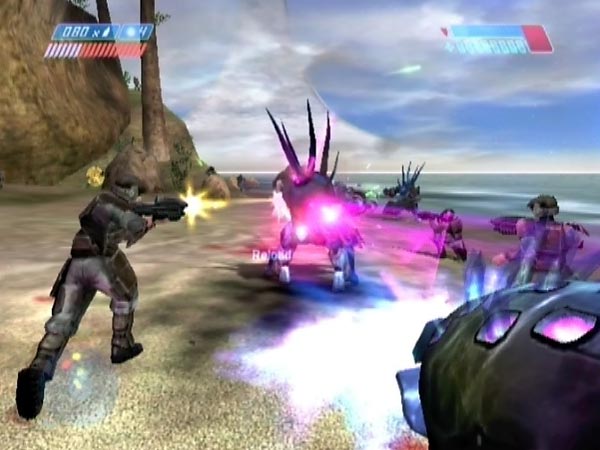
Close combat challenges
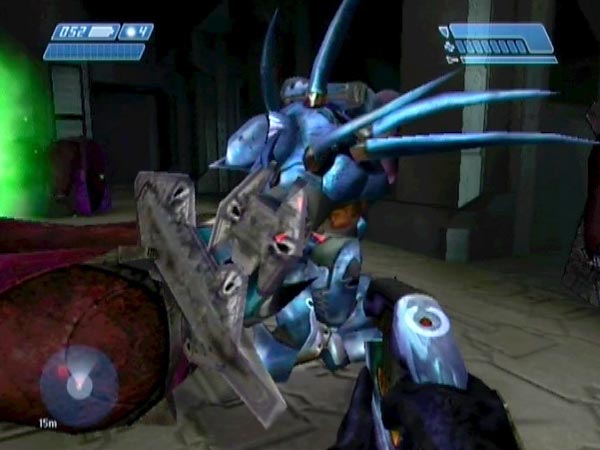
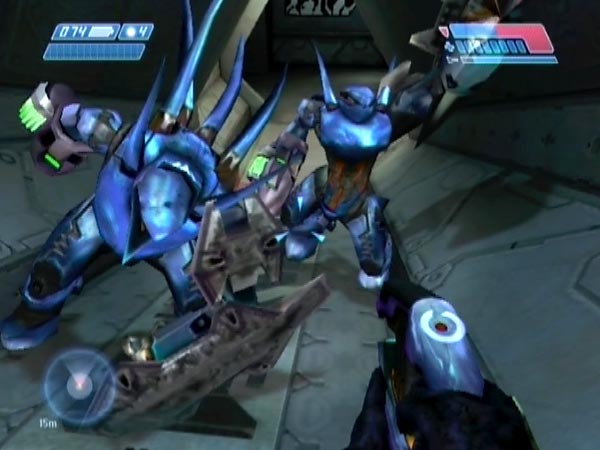
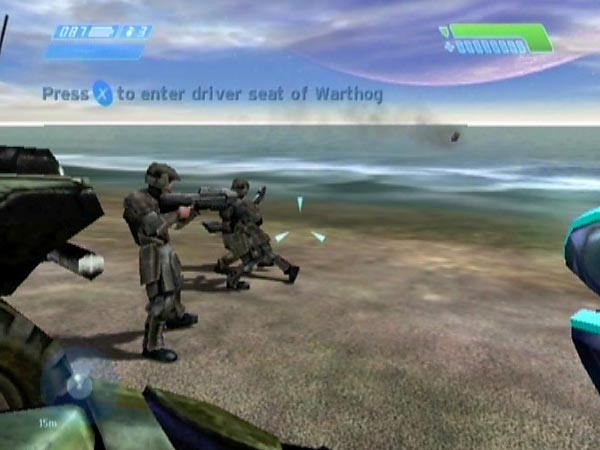
You can wade into the Hunters and see if you can kill them all with your method of choice - preferably without getting whacked. This is huge fun and you can see some of it in BCM34 on Normal, and also BCM148 on Heroic though I'd caution you that Heroic is punishingly hard if you're up against the full six Hunters.
My favourite is to use AR drilling but you've got plenty of other weapons to play with, and don't forget grenade use. Tag a Hunter as you dodge his swipe, so you can be well clear when the bang goes off; or lay down a frag at an opportune moment when it'll hurt multiple Hunters. Maybe you can even manage to blast a Warthog onto them. That should be good for a laugh.
Rockets are good fun of course, and battles can be relatively short if you're using them. Things can also be short with a pistol of course. How about trying to kill six Hunters with six shots? Or if you really want to get down to basics, see if you can survive with melee only! There are lots of challenges you can enjoy here.
Against half a dozen Hunters though, you better be good at dodging. You'll sure be getting a lot of practice! See if you can prevail without getting whacked at all, which is how I like to play things. Not easy, but it adds an enjoyable extra note of tension. Actually you can make swipe dodging into a bit of a challenge itself, e.g. seeing how long you can survive doing nothing but dodging around.
To minimize cannon fire and to have the best fun, try to keep everyone involved close up. This tends to necessitate repeatedly running over to outlying Hunters to draw them back into the mob. Keep an eye out, and keep moving around so that if any cannons do get fired, you'll probably be somewhere else.
Mischief further off
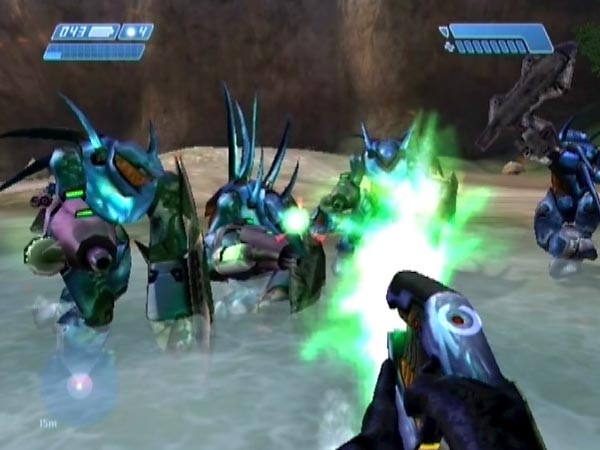
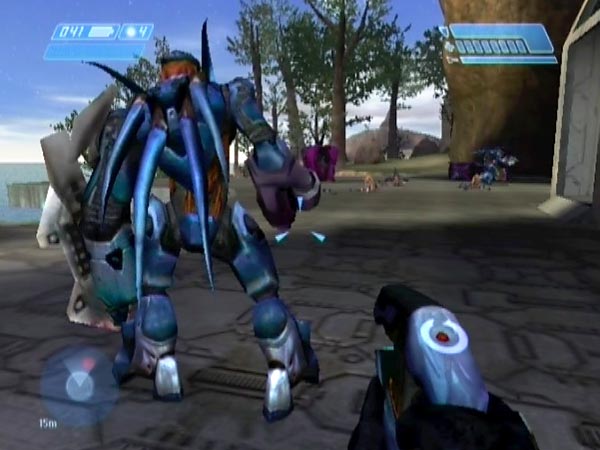
Instead of mixing in with the Hunters, how about keeping some distance? It's a lot of fun to send in rockets, which is something you could do from as far away as you like, though you may want to be relatively close to enjoy seeing and hearing the effects. On Normal it takes only one rocket to kill most Hunters (most are weak rather than strong), so you should have enough ammo for the whole lot. In places you might have the opportunity to fire from an overlooking vantage point, which can be nice. Hunters are fairly useless at hitting you with their cannons when they're firing up at you. If you're down at their level though, expect quite a barrage - easily avoided by moving sideways.
Rockets make things pretty easy, so how about fun with other weapons? I like having plenty of needlers so I can send in explosive streams or simply watch them bouncing off shields in spectacular patterns. Bouncing plasma off shields is fun too. Pistol fire is another idea.
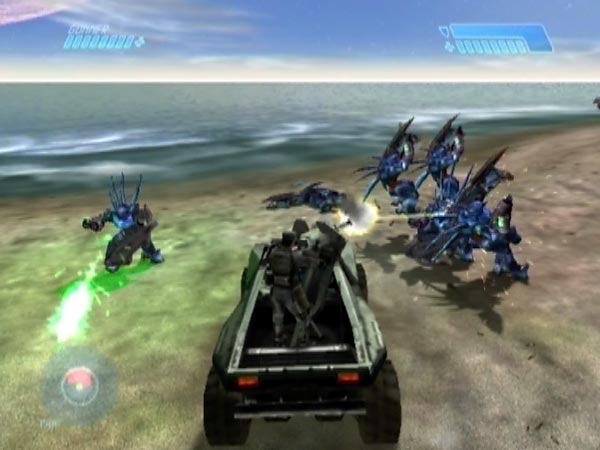
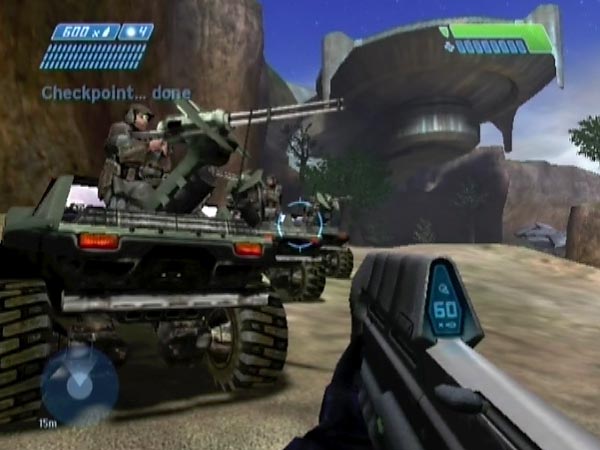
Warthog fun / Everybody jump
There's also the Warthog of course. You could use it to squash the lot, or you could whizz around letting a chain-gunner do his stuff - preferably the comical Sergeant Stacker, who really gets into his work! With this option in mind it's a nice idea if you're already aboard a manned hog at your starting checkpoint, heading for the Hunters.
When letting the gunner do his stuff, I like to repeatedly drive at Hunters to make them jump clear. That's good to do with or without passengers, but obviously you can make things last a lot longer if you avoid having a chain-gunner. See if you can get all your Hunters in a line and make them jump the same way. Funny stuff! Something else to try for: squashing all the Hunters in one nice sweeping movement. Check out BCM42 for some of this hog fun with Stacker on the chain-gun. There's one full play then a bunch of clips featuring explosive mishaps and more.
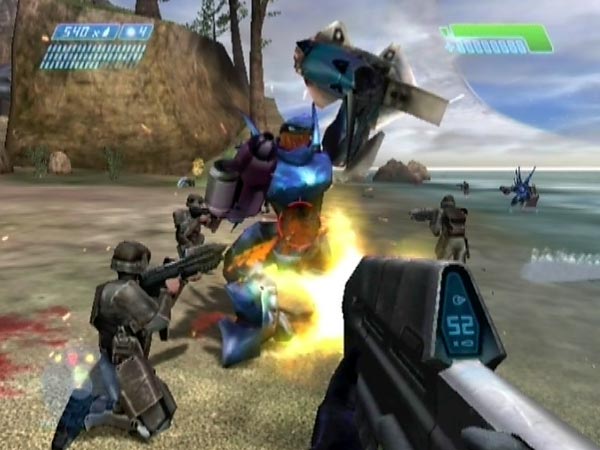
Marine support
If you position the Hunters suitably, it's possible to get a squad of Marines to run along and attack them. This excellent fun is detailed in the Marine assault section later and you can see two plays in BCM35, one fought on foot, one in a hog.
Another way of getting Marines in on the act is to drive your passengers within firing range of the Hunters, optionally make them dismount, then get clear to attack the Hunters yourself. The Marines probably won't last long but at the very least they provide a distraction. You can exploit the distraction or simply enjoy watching as the unfortunate Marines get bombarded.
Getting launched
If you park the hog suitably, multiple Hunter blasts can arrive at once, sending the hog and contents flying. That can be pretty amusing and you might even get a brief view of the island from above. You may also be able to get launched nicely when on foot, but I need to explore this whole launching business some more. Could make a nice movie! Stop press: see BCM51.
Creating a good save
Here's some advice on creating a save in which you've got five or six Hunters ready to have fun with. Later sections give additional advice.
Difficulty levels
I suggest using Normal to start with. It's excellent for close combat and gives Marines a sporting chance of survival in Marine assaults. Another plus is that most Hunters can be killed with just one rocket, so you're pretty certain to have enough rockets to wipe them out. You could try Heroic later if you want tougher battling, but it's harder to assemble your collection because Hunters are more aggressive. I should also warn you that close combat is punishingly hard on Heroic; much harder to enjoy than on Normal.
Note: On Easy it's slow work to lead Hunters into position as they're hesitant, but it's not a problem. I'm not sure what the eventual combat is like on Easy. Maybe the Hunters wouldn't swipe enough to make close combat fun? But it might be ok.
Basic plan
After the landing battle, head off anti-clockwise. Wipe out the Jackals then a small group of Elites and Grunts, then the enemies outside the main facility and inside on the top level. There's no need to go down to the door that locks.
Proceed to the security substation killing all enemies on the way, including the first two Hunters you meet (see the Hunter pair details later for why they're usually off the menu for your collection).
One at a time, lead one or both substation Hunters out to start your collection, wherever you've decided to have it. On Normal or higher you should mostly be doing it by simply running a short way ahead of him, which is fast and easy (leading Hunters is a bit different on Easy due to their hesitancy). When you finally want to get away from your pursuer, dodge a swipe and run back past him quick, leaving him standing. The reason you might want to only use one of these Hunters (leaving the other alive) is that this would eliminate a checkpoint annoyance in battle, as explained in the Hunter pair details later.
Return and use the substation. Kill the newly appeared Grunts and Jackals on the beach outside, then head off to the main facility where there are now two Hunters outside and two inside. Add to your collection as desired; but there are two important considerations for the indoor pair, so make sure to read my Hunter pair details later.
Get prepared with your preferred weaponry, maximum grenades, full health and - if you want maximum protection - an undamaged overshield. Also have a hog and some Marines handy so you'll be able to use them in battle when you want.
Get a save checkpoint somewhere near the Hunters; there are plenty available around the island. If you like a lot of chain-gun fun, you might like to have Marines already aboard the hog when you get the checkpoint. You can always make them dismount when you don't want them. If you're going to be more interested in solo battling though, it would probably be better to have any Marines well clear of the hog so you can always drive off alone with no delay.
Spare weapons
To make your save extra flexible (e.g. for close combat challenges), arrange some spare weapons so you can always pick up what you want. You could have some just near where your save checkpoint will occur, allowing you to quickly swap weapons before heading into battle. Or you could have some waiting at a planned attack point - ideally in a protected spot, as you don't want a Hunter shot to be able to sail in and blast your spares halfway across the island!
Fixing a Marine speech anomaly
When you create a save you might find that your passengers are silent in battle, which is obviously no good. I don't know what causes this speech loss, which seems quite common, but it can be fixed. In fact you can check things beforehand. Make passengers dismount then reboard. If they don't shout anything, you've got the anomaly. Leave the motor running and wait. Eventually you should hear some delayed lines and things will probably be ok for all Marines (though I've had times when it got fixed for some Marines but not others; hence you might have to do some more fixing). Sometimes I've only had to wait a few minutes for the delayed lines, but once it took about 18 minutes.
Leaving enemies alive
I listed various killing in the basic plan but it's not essential; it was just to clear the territory. You might like to leave certain enemies alive so they can be part of your eventual battling (though the presence of those enemies could make it harder to get the Hunters into position). Another reason why you might want to leave certain enemies alive is for the fully delayable checkpoint you can get by finishing them off. This can enable you to get a save checkpoint somewhere quite different than if using one of the briefly delayable checkpoints around the island's periphery.
Adding and adjusting Hunters
Here are some tips on adding a Hunter to your collection, and adjusting Hunter positions.
Unless forming your collection beneath a handy drop (see later), adding each new Hunter will entail taking him along to the others then getting away quick; a potentially tricky operation. It would help if you can make your approach under shelter, getting quite close before the mob even sees you. You could also try approaching in an arc, to help avoid fire. To escape your pursuer, dodge a swipe and run past him the other way. By the time he turns to face you, you should be far enough away that he won't chase. Other Hunters might chase if you got too close to them though, so try to avoid that. You'll come under fire as you run, so a bit of weaving might be a good idea.
The larger the collection becomes, the tougher each addition is likely to get (depending on how close to the existing mob you take the addition), and the more prudent it becomes to have full health and decent overshielding. Fortunately there are lots of medkits and overshields around the island, but make sure to leave one of each for when you've finished your collection, so you can ensure that you'll be starting your eventual save with full health and overshielding. See here for tips on getting rid of a damaged overshield so you can apply a new one.
It's a good idea to get a checkpoint before each addition, so that if things go badly you can revert for another go without having lost much work. Usually I'd let him take a swipe at me, then I'd dodge and run off to get a checkpoint just nearby (e.g. at a corner of the island). But another way would be to leave a hog just outside the danger zone, and when you reach it with your Hunter in tow, you can quickly drive off and return to attempt the addition, having got a checkpoint on the way.
Adjustment via Warthog
You don't have to take an addition all the way. You can just take him fairly close, then herd him closer by repeatedly driving at him to make him jump. This lessens the difficulty of adding a Hunter, but on the minus side the mob is likely to open fire as you drive about and there's a danger they'll hurt themselves - or kill you of course! So get a checkpoint beforehand in case it goes badly. A hog can likewise be used to adjust the mob as a whole, once you've got your Hunters assembled. You could tidy them up, get them into a more concentrated bunch, move them along wholesale to a different location, or whatever.
Grouping tendency
Hunters tend to group together to some extent, which means they won't necessarily remain exactly where you leave them. They may become more concentrated or form into pairs or larger groups, as long as they're not too separated to begin with. The grouping tendency may be weaker or non-existent on Easy however. The one time I tried things out on that difficulty, they didn't show any sign of moving closer together like they'd done on Normal and Heroic.
Using a drop
There's a special method you can use to form a collection beneath a suitable drop. Lead a Hunter up to the drop, then dodge a swipe to make him fall off. Repeat, and eventually you should have a tight-knit collection down below (which could be good for spectacularly rocketing the lot in one go). The nice thing about this method is that adding each Hunter is a lot easier and safer than usual, which could make the use of Heroic or Legendary more viable (e.g. if you want Hunter fire to be more intense in your eventual battling). There are quite a few drops you can use like this. Some are mentioned in the section on locations.
Details on the Hunter pairs
You actually meet eight Hunters on the island, but I don't think you can get more than six in a collection. Here's why. Remember the two that you meet in a circular area on your way to the security substation? Even if you bypass these 'circle Hunters', the game seems to kill them after you've used the substation (the same would go for other enemies you bypassed). And you'll need to use the substation if you want the rocket launcher and the four Hunters at the main facility (two outside and two inside).
The substation Hunters
With a Hunter from inside the security substation, the quickest way to get him down to the beach (if you want to) is to tempt him over to the edge near the substation exit, then let him swipe and miss so he stumbles over. You can jump down safely to follow him, and then lead him off to wherever you want. However, he'll probably take some fall damage if you do things this way. If you want to keep him in perfect health, the slower way is to lead him to the beach the way you came in.
Annoyingly, the death of these Hunters will trigger a checkpoint. If you include them both in your collection, you'll therefore become due a checkpoint at some time, though it could get delayed by the threat of other enemies. If you end up getting the checkpoint, you won't then be able to revert to the start of the battle - which is inconvenient. You could delay it by throwing a grenade or jumping, but it's annoying to have to do that. It could also be delayed if there's some other enemy threat prevailing - perhaps a few Jackals off yonder - but that's problematic. If you want to be rid of this checkpoint trouble entirely, only add one of these Hunters to your collection (get the strongest one perhaps), and leave the other one alive somewhere.
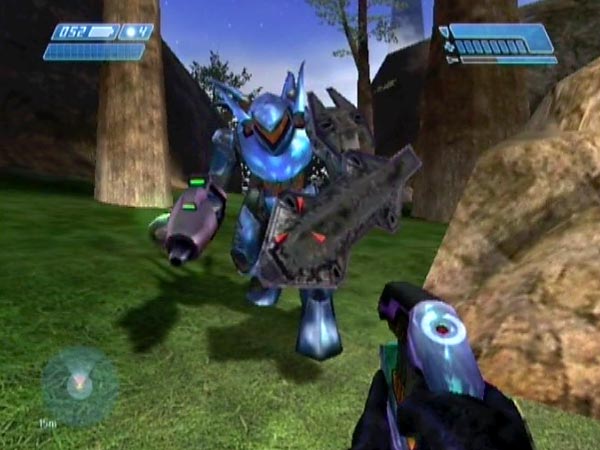
The platform Hunters
After using the substation, there are two Hunters on the platform outside the main facility (and two within). They tend to return to their platform unless led far away. For this reason the grass below the platform wouldn't be a good place to try and leave them - which is a pity as the platform would make a nice overlooking position from which to attack a collection in relative safety.
How far away do you have to take them before they'll stay where you leave them? Taking them down to the Jackal rock slabs (large slabs that had some Jackals on and around them) seems to be ok if you take them past the nearby boulders close to the sea (see later pic). Going in the other direction, taking them to the vicinity of the original overturned Warthog seems ok. I've also seen them stay put in the narrow strip of sand below the grassy hill to the left of the main facility as seen from the sea.
The chamber Hunters
The Hunters inside the main facility - in the 'Hunter chamber' as I call it - can be lead up and outside, but take heed of the following points.
(1) If you were to bring one Hunter out and then go back for the other, the first would freeze, which is no good. To avoid any freezing, keep both Hunters quite close to you when trying to lead them up over the loading point near the top of a ramp. That's quite hard because each Hunter will start heading home if you get too distant. You tend to have to keep dashing back a short way to regain the attention of a Hunter starting to leave. It's likely to take several attempts and I strongly recommend having good health and overshielding because you'll probably take some whacks during this tricky phase. Once they're up, you can return to leading them along one at a time. If you find things too aggravating, you could always settle for just one of the Hunters, giving you a maximum collection of five.
(2) Don't kill all the Jackals at the Hunter chamber, otherwise as soon as the chamber Hunters are killed in battle, you'll be due a checkpoint because all enemies from that chamber area are dead. The checkpoint could get delayed for a while, but if you were to get it, you wouldn't then be able to simply revert to get back to the start of your save - which would be inconvenient.
Locations and using a base save
Where to put your Hunters? I'm mainly thinking of having them somewhere around the outside of the island, partly because that always gives you the opportunity for distant rocketing or other distant attacks, as well as the ability to whizz around freely in a Warthog. But there's nothing to stop you having them elsewhere if you want, including indoors - though there would be a bit of a hitch relating to the loading point if you fancy taking Hunters down into the main facility.
Using a base save
If you're interested in trying out different locations, I strongly suggest creating a base save in which you've already done as much of the common work as possible, to save time. For example your save could feature six Hunters spread around the outside of the island (well separated so you can approach them individually), and a few weapon collections with weapons high on ammo. I'd recommend also making sure you still have the opportunity for a fully delayable checkpoint (by leaving one or more particular enemies alive), as those can be useful. To produce a final save you'd take a copy of the base save, move the Hunters to where you want them, reposition weapons for use (actually you might need to do some of that before the Hunter moving), and finish off as usual.
A suggested first location
If you want a suggestion for a nice first location, try putting them near the 'Grunt hill' against which the crashed Pelican nestles. In particular I'd suggest the area of beach to the left of the hill as you look at it from the sea. It's a nice big and bright open area, ideal for close combat (see BCM34) or zipping about in a Warthog while a chain-gunner does his stuff, plus you've got the option of attacking from up on the hill. You can get a save checkpoint at either end of the beach but I recommend the end near the supplies. Actually you could even get a checkpoint on the hill itself, namely a fully delayable one triggered elsewhere.
Overlooking the Hunters
In places there's the possibility of attacking Hunters from up high, with a rocket launcher or whatever. That can be good fun and it's also pretty spectacular to see Hunter shots come sailing up at over the edge (few shots are likely to actually hit you). A prime spot for this sort of thing is the Grunt hill just mentioned.
Or how about the rock slabs just around the corner from the landing zone, where a few Jackals were located? The higher one is ideal and there's a save checkpoint you can get when coming down the hill from the main facility (or you could get one on the slab itself, having triggered a fully delayable one elsewhere). It's possible to get spare weapons onto the high slab to have plenty to choose from. Just do a jump from the lower one as you swap weapons, to throw a weapon across the gap.
Incidentally, if you make Marines dismount near the slabs (on the side nearest the landing zone), they'll tend to start running for home. If you clamber up onto your slab, you can potentially enjoy watching them get bombarded by several angry Hunters. Quite a sight!
Another option is to be on the platform outside the main facility, overlooking Hunters gathered on the grass below. Unfortunately it would be no good in regard to the platform Hunters as they'd tend to come back up after you led them down. But it would be ok if you're happy to omit that pair from your collection. There are a few other possibilities around the island, and you could also get up on top of the island for some long-range attacking.
Marine assault
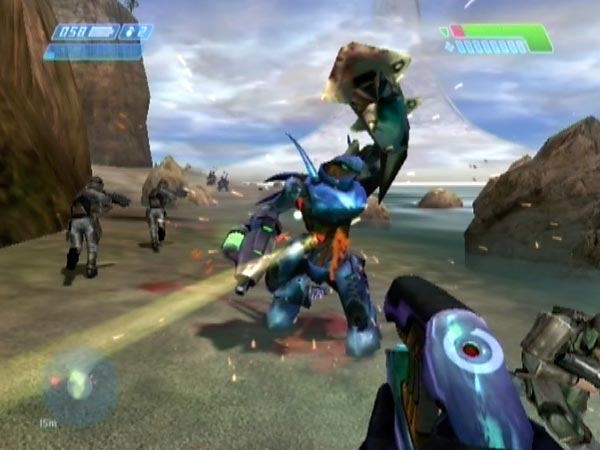
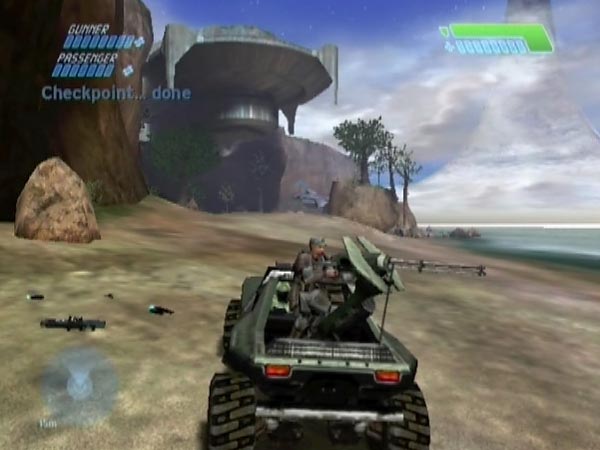
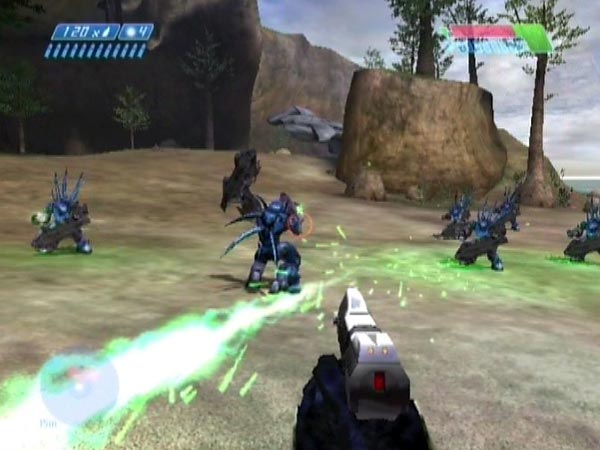
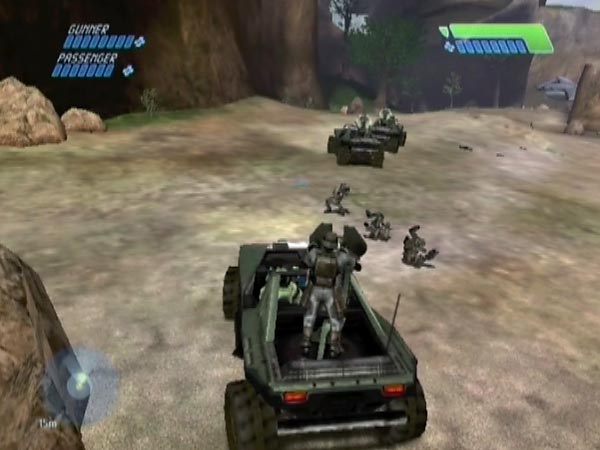
By exploiting some Marine homing behaviour, you can get a squad of Marines to run along and assault an arrangement of Hunters - and possibly other covies too if you left them alive. Here's the general idea. Use three Warthogs to ferry six Marines away from 'home' - the place where they collect after the landing battle. When you make them dismount, they'll tend to start running for home if close enough. If you've moved some Hunters there or to anywhere along the homing path, your bozos are now on a collision course and you're in for some amusement. You can back them up on foot or have fun whizzing around in a hog.
The Marine homing area
When you get your guys dismounted from the hogs, they'll need to be within the Marine homing area else they won't head for home at all. How far does the homing area extend? Going clockwise from home, it seems to extend all the way along the beach and around the corner, and all the way along that next beach (with the Grunt hill and crashed Pelican), right up to near the far end. Going the other way it seems to extend all the way along the beach and around the corner, about as far as where you get a further checkpoint.
However, things seem a bit fickle. Sometimes when you get the Marines dismounted, some of them may not immediately run for home. Some may just stand around or only walk slowly, but they seem to get spurred into action once alerted to the enemy (they may also start running when you're nearby driving a hog). With this in mind you might like to have them dismount within sight of the enemy, to try to ensure prompt running.
Beach sweeps and more
Rather than having the Hunters in a concentrated group, I'd suggest spreading them along the homing path so you get to tackle them bit by bit, such as in the 'beach sweeps' of BCM35 and BCM188 where I'd left other enemies alive to add to the fun. Marines try to keep running for home (except when in rage mode), which means that they'd tend to be quickly past any tight grouping. You'd probably get held up wiping out the Hunters while the surviving Marines are running off into the distance, which isn't ideal. If the Hunters are only met gradually however, it's easier for you to keep up and have Marines nearby throughout the action.
It's fine to have Hunters concentrated at the Marine home however. You might like to hop up onto a rock and watch the action. Even if you're down on the ground, the Hunters still tend to focus on the Marines. They'll turn this way and that as they try to find a victim to swipe, and it's basically chaos with Marines getting knocked about all over the place. It's a pity that area is so dark, but maybe you could brighten things up with a few explosions eh?
During an assault, I rather like sending explosive streams of needles in on Hunters, especially when they're distracted by Marines. It's certainly not the ideal weapon here because the bangs often hurt or kill nearby Marines, but that's just their own fault for not getting clear, right? An AR is my other favourite. On Normal it's weak enough to make me have to work reasonably hard with it, to cut through the opposition.
More than six Marines
With additional effort it's possible to set up an attack of more than six Marines. There are nine available on Normal (only seven on Heroic). For the beach sweeps of BCM35 and BCM188 I had six Marines in hogs, plus three standing nearby. Those three are close to the edge of the homing area, making them hesitant about running while things are quiet. That was the key to setting up the nine-man attack, but it's a delicate balancing act. Here's how you can achieve such an arrangement.
First bring all Marines along to near that corner, but keep the ones on foot well out of the homing area for now; e.g. have them back near the supplies. Position three manned hogs and save a checkpoint (the corner is a never ending source of checkpoints, subject to a minimum separation of about 15 seconds). Test whether those six Marines will home ok; see if they reliably start running when you get them dismounted and attack the nearest enemies. If they don't, you need to move one or more hogs closer or possibly adjust their angles (you don't want anyone to feel blocked when he dismounts). Once the hog positions are good, move any spare weapons to where you want them, and save a checkpoint.
You're going to temporarily move the rear hog now. Use it to deposit three Marines very near the edge of the homing area, but be conservative. If any of them starts running prematurely, you'll have to either revert, or eject and restart. It would also be a problem if anyone starts walking about. If things go ok however, get the last two Marines aboard and get a checkpoint as you head back to the others. Return the hog to it's original position as best you can, but on the way, make the standing Marines dive closer to home (but if anyone starts running, revert). Dismount and get a checkpoint.
Check whether you can now get a reliable nine-man attack. If any of the standing guys tend not to join in, ideally you want to move them a bit closer to home then get a new checkpoint. One idea is to use the rear hog to cause diving, but the trouble with this is that when you're driving, it makes those guys prone to start running. Instead you could cause diving with a frag throw (then head to the supplies to replace it, but jump as you go, to avoid a checkpoint until returning). Or you could drive very slowly and nudge Marines. They seem less inclined to start running as long as you go dead slow. A fourth option is to make a brief movement with the rear hog, which might make someone start to run then stop. But whatever method you try, be prepared for many attempts until you get lucky and nobody runs off prematurely!
Another way of ending up is to be driving the manned third hog, approaching the other Marines, angled so that you can easily make the standing Marines dive closer to home. It's possible to get a handy checkpoint for this. Each time you start from there, you can make the standing guys dive - which will hopefully ensure that they join the attack - then get the hog Marines dismounted.